[photo courtesy BVBG]
| Restoring my Bristol MW - by Nigel Furness |
|
I have been interested in transport of all forms for as long as I can remember. During the late 1960s and early 1970s I began to pay particular attention to the buses that I used to travel to school in Bristol. I learnt a great deal more when I discovered there were such things as "bus enthusiasts" and that some of my school friends partook of this particular sport. So I learnt to recognise REs, Lodekkas, KSWs, LSs and the various other types that operated around the city; one of the facts discovered was that the chassis of these buses were built in Bristol and the bodies built in Lowestoft, at Eastern Coachworks (ECW). From that tiny fact sprang a life-long interest in the Bristol product and all that had gone before it, leading to a special interest in Thomas Tilling, but of more that elsewhere. In the fullness of time school gave way to work and a bit of part time college and, as you do when in the first throes of adulthood, I bought a bus. Or rather I and several other misguided individuals bought a bus, a 1949 Bristol L5G formerly owned by Bath Tramways Motor Co. to be precise. A discrete veil is best drawn over what followed; needless to say the vehicle no longer exists (although parts of it do) and I retired from bus preservation sadder and wiser, not only in the practical department but also in the ways of human nature in general and group dynamics in particular. And so my interest languished, in fact for 20 years until the British Bus Preservation Group came to my notice. "Ah", thought I, "here will be a group of people, organised of purpose, skilful in implementation and certainly knowledgeable etc.
|
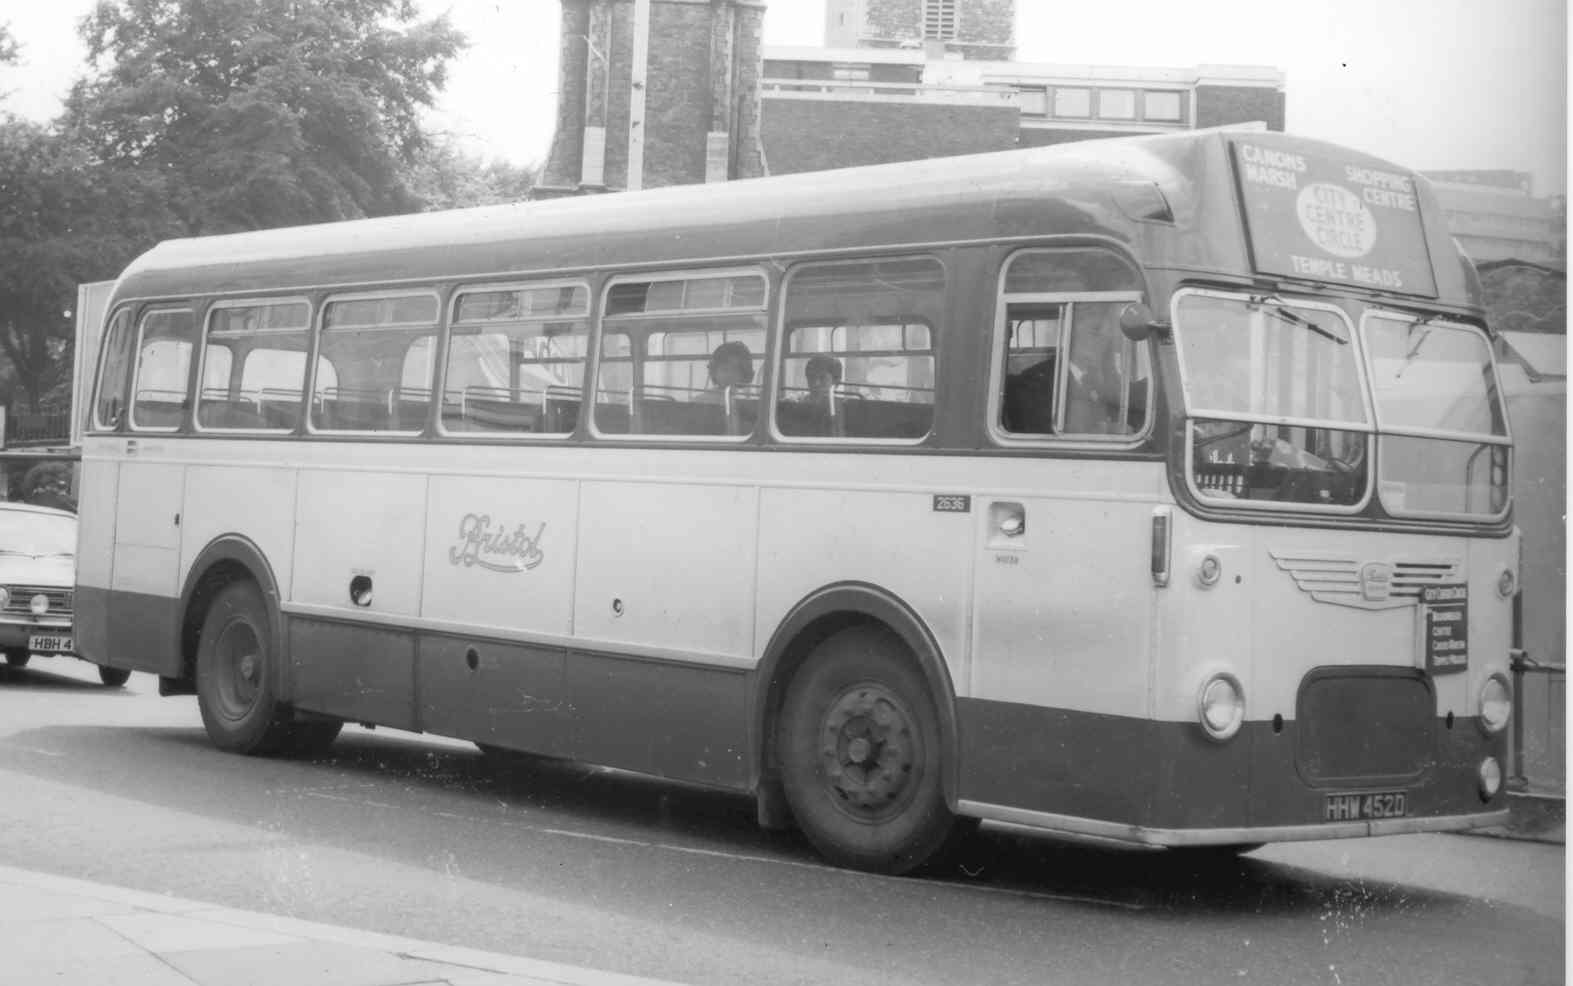
| To the right is a picture of my bus
when in service with Bristol Omnibus. Points to note include the
excess of cream around the middle of the vehicle, indicating a
"one-man-operated" or "OMO" bus and the slip-boards -
removable signs for when the bus was used on the "City Centre
Circle" route. This picture dates from around 169/70 -
previously the bus had a cream roof as well.
[photo courtesy BVBG] |
|
|
A plan was hatched to look for a suitable pre-war bus to buy and restore, partially for therapy and partially because it seemed a commendable way of supporting the burgeoning heritage movement. Needless to say, all that went by the board when in the first issue of BBN I saw an advert for a 1966 Bristol MW. Not just any old MW, either, for indeed thousands had been made and apparently even more still exist, but the very last service bus MW for Bristol Omnibus, and the very bus that in my teenage years used to ply the City Centre Circle and took me to Bath Road Motive Power Depot for a spot of surreptitious locomotive investigation when I should have been playing rugby. So the deal was done, on 2nd December 1995 and the bus was duly delivered to its new home in Mother-In-Law's garden a few weeks later. Thus began the long haul of returning the bus to its former glory, in this case as it would have appeared in 1968/9 as that was the time when I was most familiar with it. Time, however, had not been too kind to ex-Bristol Omnibus No.2636; its last job was as a berry-picker's bus and it was severely battered. There wasn't a straight, dent-free panel below the waist rail and the roof wasn't much better!It also came with a slipping clutch and no first gear, and those were just the problems I knew about! The mid-90s in the UK was a period of exceptional dryness in the weather; lured into a false sense of security by this I decided that I would prove it was perfectly possible to restore a bus in the open. In fact, lots of work was successfully completed but in the end I had to admit defeat. But by this time its was obvious to the domestic authorities that this was a serious thing and not a passing swing, so permission was given for a shed of suitable proportions to be erected. This was completed in 2003 and the old girl was installed and has come on in leaps and bounds since then. A new radiator grill had to be made if the bus was to look correct - most MWs had their grills panelled over in the early 70s due to excessive engine cooling (not via the heaters though, if memory serves me correctly!) The fuel
tank was replaced with a new one, as were all the fuel lines and filters.
The engine died within several days of the bus arriving so a baptism of fire was
received in dealing with the problems an old bus can throw at you. We were
turning the bus in the yard, ready to park it in its allotted spot when the
engine simply stopped. It did not restart for 6 years! So what
happened in between? Well, the engine stopped with the bus parked securely
across the entrance to the yard so nothing could come or go. According to
my wife my face turned a slightly greenish-shade of white, she reckoned the only
other time she had seen it that colour was after a long and wallowing ride
in the rear seat of an ancient and under-damped Volvo. At the time I knew
nothing of the simplicity of diesels so a few frantic phone calls later had me
driving the bus in third gear on the starter motor! I managed to get it
out of the way then proceeded to examine the fuel system as I had been advised.
I made the mistake of rubbing a rusty patch on the fuel tank with my finger
which promptly started to leak diesel. Panic stations for the second time
in one day; the tank was nearly full, thanks to the kindness of the
previous owner. It had to be drained, but how? A baby's bath tub and
two big plastic dustbins were pressed into service to store the fuel.
So before the engine would run again we had to find a new tank, clean out the
remains of the old one from the choked filters and fuel pipes and reinstall it
all. Eventually the engine ran again, in 2001, when it was all done and in
2003 we were able to drive it into its new shed at which point the clutch
finally gave up the ghost!
First job
under cover was to pull the gearbox out and replace the clutch. Whilst the
gearbox was on the floor, first gear needed attending to so I stripped the box
down and rebuilt it with bits of another 'box I had on loan. I doubt many of you
will know the innards of a Bristol gearbox intimately, suffice to say it's a great big lump but otherwise straightforward to work on.
Replacing first gear means replacing both first and second gears as they are on
the same hub. The same goes for the lay gears as I felt it was asking for
trouble to try and match a pair of gears (the second lay gear in this case with
replaced main gear) whose teeth had not bedded together. When it was all back
together I found no gears could be selected! A quick check revealed I had
accidentally reversed the second/third synchroniser hub. I was able to
correct this reasonably easily by pulling out the mainshaft and releasing the
assembly. It is all back in the bus now and all gears can be selected so
fingers crossed it will be OK to drive. Most of the
mechanical work is done, all that remains is to change the two front springs for
two good spares that I have when I can afford to have them reconditioned and all
the oil hoses need replacing on the engine so for the moment panelling and
painting is the order of the day. The windows are taken out and
reinstalled with new glazing gasket when each section receives its final coat of
paint. Working single-handedly doesn't really bother me as I enjoy my own
company, but it does mean everything takes a very long time. Refitting the
windows needs an expert so my friend Ian provides some indispensable assistance
when he isn't working on his own a fleet of vintage coaches, I can usually call
on my other friend Andy to help with the heavier jobs, but since we've both now
got bad backs it could be some time before those springs get done! Then there's
all the seat frames to rub down and paint, all the seat covers to make up from
the new moquette…
Despite having restored several old cars and having previously been involved with the
L-type mentioned earlier, I regard myself very much as a beginner in this hobby.
So what have I learned so far? Taking everything apart is the easy bit.
Don't waste time undoing nuts and bolts that are awkward, get the angle grinder
or gas torch on them. You can always replace nuts and bolts with new and
it saves so much time. Keep everything with the bus and label it if
possible. Record in a log everything you do, make diagrams of how pipe and
wiring runs go - don't rely on your memory, because in ten years time it won't
be there anymore! Putting things back together, on the other hand, is
really like building a new bus from scratch without the benefit of experience or
detailed engineering documentation. You really do need to plan a project
of this size, otherwise you find yourself faced with so many tasks and the
temptation is to start all of them and not finish any! I have found the
best approach is to break the job down into the major tasks that need to be done
before the bus is complete. That might start with something as simple as
"Body" and "Mechanicals". Then I use this to create
something called a "critical path diagram". This shows all the
smaller tasks and their dependencies - from this you can see what jobs you ought
to be doing and it also shows you jobs you can have in progress at the same
time. I have found this an invaluable tool in making best use of time and
resources and to avoid the project getting stalled.
|
| Home Pictorial restoration diary, 1995 - 2003 2004 2005 2006 2007 2008 |